Install Guides
React Native
This article provides instructions on adding the Ditto package to your project by importing, initializing, and preparing Ditto to be integrated successfully with your React Native apps.
- Bare React Native Support
- Prerequisites
- Integrating Ditto
- Configuring Sync
- Enabling smallPeerInfo Feature
- Setting Up Presence
- Setting Logs to Debug Level
- Troubleshooting JSI Bindings Error
React Native CLI Support
The Ditto SDK is designed for apps built with bare React Native CLI.Expo Go is not currently support. Support for other Expo workflows including CNG and DIY are limited. This work is in active develepoment.
1
Set up a React Native CLI project. (Creating Your Project)
2
Install the Ditto package into your project. (Installing the Ditto SDK)
3
Install the project dependencies. (Installing Dependencies)
4
Enable your app to sync with nearby devices. (Setting Up Transport Configurations)
5
Import the previously installed Ditto SDK package in your app. (Initializing Ditto)
6
Set up permissions handling. (Handling Permissions)
7
Set up authentication. (Setting Up Authentication)
8
Specify how Ditto should handle sync. (Creating a New Instance of Ditto)
9
Set up transport configurations. (Setting Transport Configurations)
10
Initiate sync at global scope. (Starting the Sync Process)
11
If desired, enable the Small Peer Information feature. (Enabling smallPeerInfo)
12
If desired, monitor the activity of remote peers in the mesh by logging relevant information in logs or using Ditto’s Presence Viewer app. (Setting Up Presence)
13
If desired, set the log level to debug. (Setting the Logs to Debug Level)
14
Create your subscription logic. (Constructing Subscription Logic)
Creating Your Project
First, set up your environment and initialize your React Native CLI project. For instructions, see React Native’s official documentation* on **Setting up the development environment*.To verify that you’ve set up your environment correctly, install and run the React Native CLI doctor. For more information, see the official Meet Doctor, a new React Native command React Native blog post.
Installing the Ditto SDK
From a terminal, navigate to the folder containing your React Native project, and then, using your preferred package manager, run the Ditto package:Installing Dependencies
From the root of your project, install project dependencies based on thepackage.json file:
Configuring Permissions
Once you’ve added dependencies, set up the prerequisites to enable Ditto Transports for iOS and Android.iOS
From Xcode, enable Bluetooth LE and local network services in your app:1
From your project’s Once implemented, these string values display to your end users as dismissable prompts explaining why the app requires certain permissions.
Info.plist file, add the following key-value pairs:Tip: To view
Info.plist as source code, right-click the file from the left sidebar in Xcode > click Open As > and then select Source Code from the menu.If desired, customize the default values for the permission prompts by replacing them with your preferred text.For example, if your end users prefer a language other than English, you can replace the default English strings with their language equivalents.
2
Ensure your app continues to sync while it runs in the background by enabling Bluetooth LE background modes. Once enabled, your app continuously syncs in the background, even while the device is locked.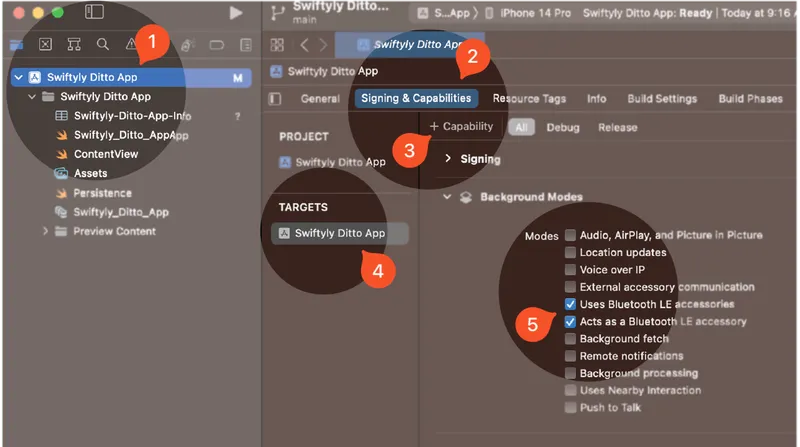
For official instructions, see Configuring background execution modes from Apple.
- From the left sidebar, click to select your project.
- Click Signing & Capabilities.
- Click + Capability, and then from the modal that appears, search and select Background Modes.
- From TARGETS, select your app from the list.
- From Background Modes, toggle the following:
- Uses Bluetooth LE accessories
- Acts as a Bluetooth LE accessory
Android
From Android Studio, set up transport configurations for the Android target:1
Update Android’s minimum SDK version to
24 or higher:- Open the project-level
build.gradlelocated in theandroidroot directory. - Set the
minSDKVersionto24.
For newer projects, set the SDK version in
android/gradle.properties.2
Add the Ditto SDK as a dependency:
- Open the module-level
build.gradlelocated in theandroid/appdirectory. - Add the following line into the
dependenciesblock located at the bottom of the file:
3
Android permissions
4
If using React Native’s Legacy Architecture, you must add the following code snippet to the module-level
build.gradle located in the android/app directory:If you encounter other issues, see Troubleshooting JSI Bindings Error.
5
Start the app in Metro:
Initializing Ditto
Within the top-most scope of your app, import the Ditto package with the necessary modules and components from the Ditto’s SDK library:Handling Permissions
Within your default React component (App), use this helper function to request permissions if developing for the Android target:
Configuring Sync
Using an asynchronous function, let’s say,startSync(), do the following:
1
Define an identity configuration with authentication settings. (Setting Up Authentication)
2
Instantiate a
ditto object with the specified identity. (Creating a New Ditto Instance)3
Configure peer-to-peer transport settings and enable transports. (Setting Transport Configurations)
4
Initiate sync. (Starting the Sync Process)
Setting Up Authentication
Create an identity object, define your authentication type, and then provide access credentials. Each instance of Ditto running in your app must prove its identity to other peers to sync. There are two types of identities you can use to authenticate:onlinePlayground— Explore platform features and functionality without setting up your authentication mechanism.onlineWithAuthentication— If developing a production-level app, integrate your own identity provider, such as Auth0, identify users, give users read or write control, and integrate with your existing authentication systems.
onlinePlayground
Use an online playground identity for development. You can find authentication details for your app on the Ditto Portal. Use these to set up your identity:onlineWithAuthentication
Use theonlineWithAuthentication identity when developing a production app for deployment.
Creating a New Instance of Ditto
Within atry statement, instantiate a new Ditto object with the identity you’ve specified:
Setting Transport Configurations
Using aTransportConfig instance, do the following to set up transport configurations in your app:
1
Configure peer-to-peer transport settings so that all desired transport types available on the end-user device are available to Ditto.
2
Specify how you want Ditto to handle which transports to sync data across the mesh.
Constructing Sync Subscription Logic
Create the logic that performs sync and data operations in your app, including registering subscriptions, executing store operations, and observing changes in the given collection. For example, the following snippet defines a document object (document), creates a subscription for the Cars collection, executes database operations and logs the results, registers an observer for watching changes in the Cars collection:
Starting the Sync Process
To start syncing with other peers in the mesh:Enabling Small Peer Info
Enabling the smallPeerInfo feature allows you to gather and store peer-to-peer sync and network details automatically rather than continuously query Ditto for this data. Once enabled, collected details are available within the Ditto portal. For more information, see Using the Device Dashboard. You can configuresmallPeerInfo directly on the Ditto instance.
Setting Up Presence
Monitor remote peers in the logs or using Ditto’s Presence Viewer app. For more information, see the blog post “An explanation of the Ditto Presence Viewer.” To set up presence observations:Setting Logs to Debug Level
Capture database debug logs by setting the Ditto log level to Debug mode. That way, any potential issues are tracked. To set the minimum log level toDebug:
Troubleshooting JSI Bindings Error
When using the Ditto SDK for React Native in the iOS simulator, you may encounter issues related to the JSI bindings not being installed for the DittoRNSDK module when using the Hermes JavaScript engine. To resolve the issue, modify your project settings and dependencies:1
From the
ios/Podfile file in your project, set the minimum deployment target for iOS:2
From the
ios directory in your project, update CocoaPods dependencies:3
If you encounter a filesystem permissions error after updating CocoaPods dependencies:
- From Xcode, disable the macOS App sandbox. For instructions, see the official Configuring the macOS App Sandbox from Apple.
- Using the
sudocommand, run your project with elevated privileges.